texxer / 02
Layers
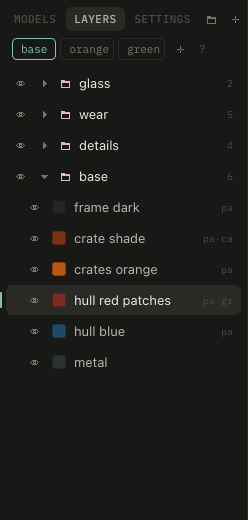
Layers stack bottom to top. A new layer starts with an empty paint mask and shows nothing until painted; another mask takes its place. A layer without masks covers everything.
- color from:
- layer: its own color. Swatches reuse colors of other layers; the pipette (K) takes one from the model, as the layers show it before baked light.
- stamps: the colors of its image stamps and photo snippets.
- paint: the brush paints colors, many in one layer, for details on a projected photo. The brush gets its own color (K sets it); painted colors keep their own entries in the auto palette, so small details aren't crunched away. clear under the swatches forgets them.
- model: the model's own texture or material colors. One such layer alone just crunches a finished texture; layers above it add to it. texxer keeps a copy of the original beside the project, since the export overwrites it.
- glows: the color also goes into the emissive map (color channel only).
- adjust (folded): hue, saturation and brightness of whatever color the layer takes, photos and model colors too. match, then click the model where the color is right: the layer's mean color shifts to it, for pieces from different photos.
- surface (folded, click to open): tone and tone scale for lighter and darker patches at a world size, grain for single texels a bit lighter or darker, shine for baked sheen and glints.
- blend: normal, multiply, add, overlay, relief. Relief takes gray stamps as bumps: mid gray keeps the surface.
- opacity
N new (in the picked folder, if one is), D duplicate, ⌫ delete, V show or hide, ↩ rename, ↑ ↓ select, ⌥↑ ⌥↓ move, into and out of folders on the way. ⌘click marks more layers, ⇧click the ones in between: ⌫, V and dragging then take them all, Esc drops the marks. Right-click a layer or folder for the same and more: flatten to paint bakes the layer or the folder's shown layers into one layer that paints colors, above them, to touch up with the brush; the originals stay, hidden.
A newly selected layer flashes where it shows on the model; the target beside the eye, or ⌥ over the layer, holds it. ⌥click the model picks the topmost layer there. Drag over the eyes to show or hide several, ⌥click an eye to show only that layer, again for all.
When dragging, the line shows where the layer lands: indented inside a folder, at the left edge below it. Esc cancels.
Folders
⌘G puts the layer into a new folder, ⇧⌘G dissolves it. Drag layers onto a folder to put them in. Folders hide and show all their layers.
Click a folder to give it a zone: with pick on, clicks in the view add parts (⇧click single islands), as on a surfaces mask; Esc ends. Its layers show only there. Without a zone, the folder covers everything.
Channels
The tabs over the view are the channels, each a texture with its own layers: color, ao, rough (roughness) and glow (emission). Only color is there from the start; click a dimmed one to add it, right-click to delete it with its layers. A steps through them.
- ao and rough show gray: layers paint the brightness of their color. Both start white, no occlusion and fully rough.
- ao multiplies into the color by default, baked in as retro textures have it. Turn into color off to export it as its own map, for Godot.
- glow paints over what glowing color layers give.
- onion (O steps through) shows another channel faintly over this one, to paint by it. It isn't exported.
Right-click a layer or folder, copy to another channel: the base colors as a start for roughness, a lit panel from the color for the glow.
Dirt
⇧1 to ⇧7 add dirt above the selected layer: dust on top, grime in cavities, dirt from below, rust on edges, drips below edges, chips with rust (two layers sharing one map), and a grunge brush that paints dirt with the brush (B). They are also at the top of the material menu (⇧M).
Materials
A material is a folder of layers: worn steel, painted metal, rust, wood, plastic, rubber, glass. ⇧M or the ball above the layers adds one above the selected layer, with pick on so the next clicks set its zone. Put the main material first without a zone, then the others with theirs.
save in a folder's panel keeps it as your own material, for every project. Surfaces, paint and stamps stay with the model.